How to Screenshot on a Laptop: A Complete Guide
Whether you’re capturing a funny meme, documenting an important document, or saving an error message for troubleshooting, knowing how to take screenshots on your laptop can be incredibly handy. In this guide, we’ll walk you through the simple steps to capture your laptop screen and answer some common questions along the way. Let’s dive in!
Key Takeaways
- Versatility: Screenshots can capture anything from error messages to online content for sharing or troubleshooting.
- Ease of Use: Both Windows and Mac provide straightforward keyboard shortcuts for taking screenshots.
- Advanced Features: Third-party software can offer additional functionality, like editing and capturing scrolling windows.
- Accessibility: Screenshots are saved in accessible locations, like the clipboard, desktop, or designated folders.
Understanding Screenshots
A screenshot is essentially a digital snapshot of whatever is currently displayed on your screen. Screenshots allow you to capture and save moments for future reference or sharing with others. They are invaluable for everything from tech support to sharing interesting online finds.
How to Take Screenshots on Your Laptop
The method for taking screenshots can vary depending on your laptop’s operating system. Here are the most common methods:
For Windows Laptops
- Using Keyboard Shortcuts
- Capture the Entire Screen: Press the “PrtScn” (Print Screen) key on your keyboard. This captures the whole screen and saves it to your clipboard. You can then paste it into an image editor or document using “Ctrl + V”.
- Capture a Specific Window: Press “Alt + PrtScn”. This captures the currently active window and saves it to your clipboard.
- Using the Snipping Tool
- Open the Snipping Tool: Search for “Snipping Tool” in the Windows search bar and open it.
- Capture Your Screen: Select “New” to start a new snip and use your mouse to select the area of your screen you want to capture. You can choose from different snip types like free-form, rectangular, window, or full-screen.
- Using Third-Party Software
- Install Software: Programs like LightShot and Greenshot offer additional features such as editing and annotating screenshots. Download and install one of these programs for more advanced screenshot capabilities.
For Mac Laptops
- Using Keyboard Shortcuts
- Capture the Entire Screen: Press “Command + Shift + 3”. This captures the whole screen and saves the screenshot to your desktop.
- Capture a Specific Area: Press “Command + Shift + 4”, then drag the crosshair to select the area you want to capture.
FAQs About Screenshots
- Can I take screenshots on a Mac laptop?
- Yes, Mac laptops have built-in screenshot functionality with simple keyboard shortcuts.
- Where are screenshots saved on my laptop?
- On Windows, screenshots are typically saved to the clipboard or a default folder like “Pictures”. On Mac, they are usually saved to the desktop.
- Can I edit screenshots after taking them?
- Yes, you can use image editing software such as Paint, Photoshop, or online tools like Canva to edit your screenshots.
- Can I capture a scrolling window or webpage?
- Yes, some third-party software offers the ability to capture scrolling windows or webpages by stitching together multiple screenshots.
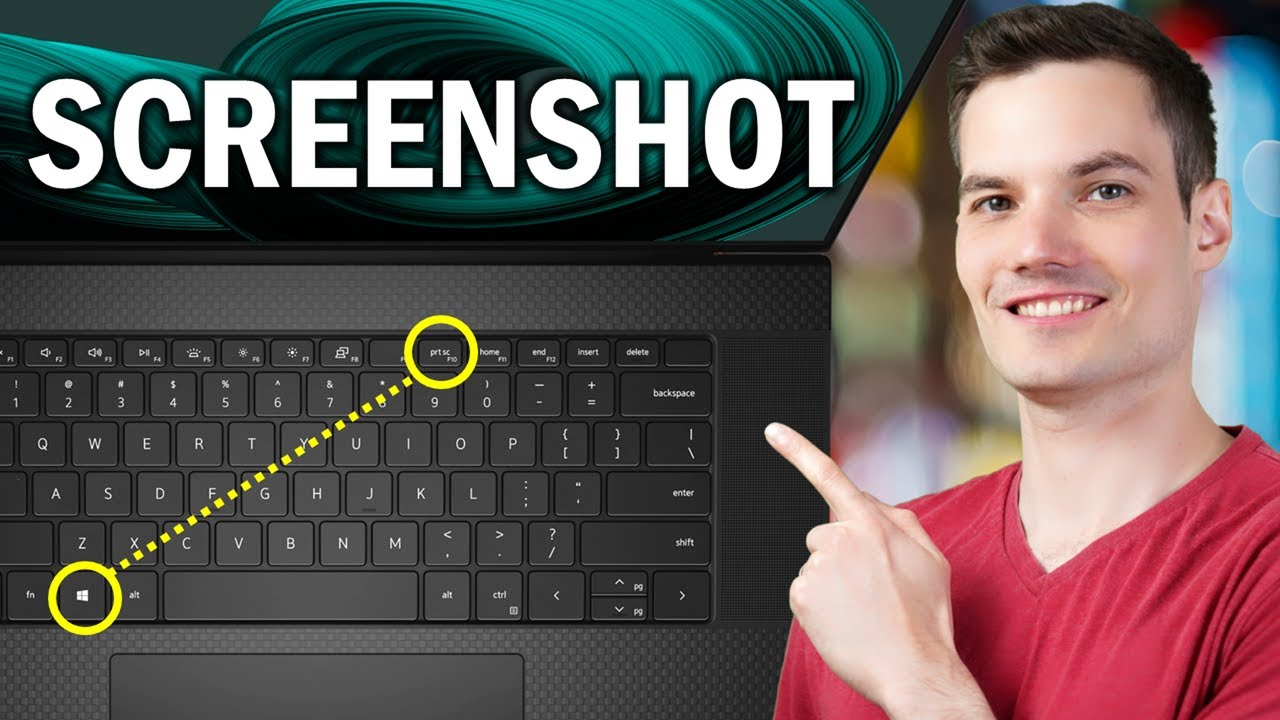
- How do I take a screenshot on my HP laptop?
- Press and hold the Windows key, then press the PrtSc key. The screen will dim briefly, indicating the screenshot was taken.
- How do I screenshot on a laptop without PrtScn?
- Use the shortcut “Windows + Shift + S” on Windows to open the Snip & Sketch tool, which allows you to capture a specific area of your screen.
- Can I take screenshots in games?
- Yes, you can usually take screenshots in games using the same keyboard shortcuts or specialized software designed for gaming.
Conclusion
Taking screenshots on your laptop is a skill that can save you time and make sharing information easier. Whether you’re documenting important data, troubleshooting issues, or just capturing something fun, screenshots are an incredibly useful tool. With the methods outlined in this guide, you’ll be able to take screenshots quickly and efficiently. If you have any questions, feel free to leave a comment below. Happy screenshotting!
Leave a Reply