
How to Screenshot on Any Generation iPhone
There isn't a print-screen option on your iPhone screen. However, you can easily capture a screenshot on your iPhone using just a few buttons. It doesn't matter if you have an iPhone 8, iPhone 8, iPhone 15, or any other model; you can still take screenshots. Screenshots are a fantastic way to share smartphone issues, funny moments from web pages, or even strange text messages you've received. All you need to do is learn which buttons to press, and that's exactly what we'll explain here. Additionally, we'll provide some tips to enhance your iPhone screen-capturing skills.
Taking a photo is a breeze with just a simple press of two physical buttons simultaneously. However, the specific buttons you need to use may vary depending on the model or version of iPhone you have.
Screenshots can be taken on the latest iPhones
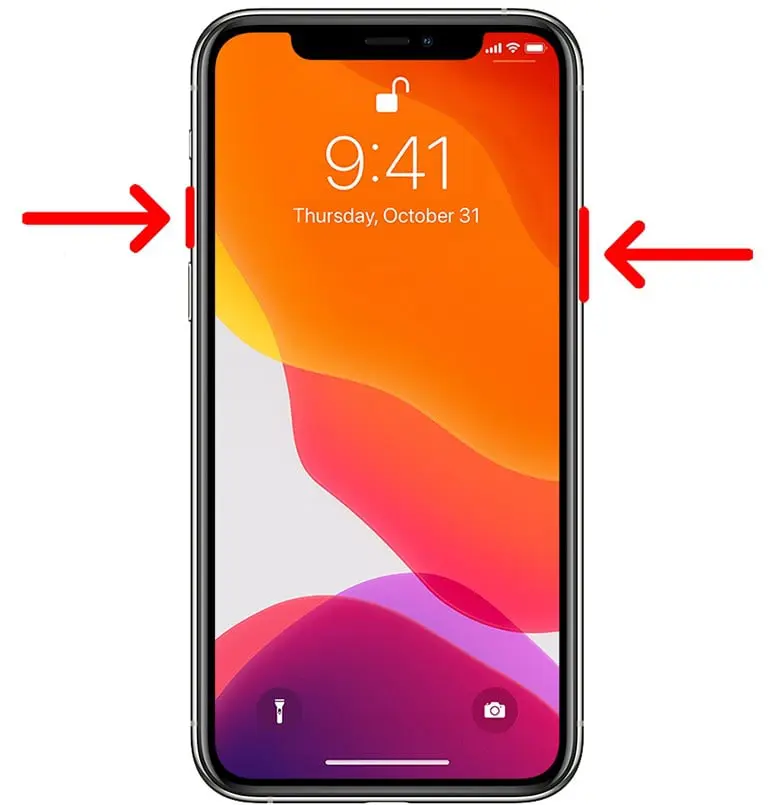
These are the keys to push if you own an iPhone that does not have a home button. This means that you're using an iPhone that is among the perfect iPhones that are available today.
Step 1. The initial button to push is the one found near the upper-right edge of the screen of your iPhone. The one you typically hit to turn the screen off and then lock your iPhone.
Step 2. Another option you'll have to hit is Volume Up. It's located to the left of the iPhone.
Step 3. To create a screenshot, click the two buttons at simultaneously.

Capturing a screen shot using an iPhone using the “Home” button
If you're still using one of the earlier iPhone or have just purchased an upgraded iPhone with an older model, you'll perform the same steps in the above paragraph; however, you'll press the home button in the same way as you did with the other button mentioned above.

Snapping a screenshot together AssistiveTouch
AssistiveTouch lets users make more advanced touch-based gestures using the iPhone (such as swipes, pinching and using 3D Touch) through the simple menu, which is only a couple of taps away. This can be helpful in many ways; however, in this instance, it's a different method to capture screenshots when you have a button that isn't operating properly or if you're not able to push both simultaneously. Learn how to set this up and how to use the feature.
Step 1. Open the . Settings application.
Step 2: Tap Accessibility.
Step 3: Tap Touch.
Step 4: Tap AssistiveTouch
5. Turn on assistance and touch off. The AssistiveTouch button pops up on the screen. It bears a resemblance to an array of faded circular circles.
Step 6: Tap Double-Tap.

Step 7. Scroll down, then click Screenshot.
Step 8. Scroll up to the screen. The assistiveTouch button will remain on the display.
Step 9: Once you've found an area you'd like to save an image, click twice on the AssistiveTouch button. The iPhone screen will flash briefly in white. You'll also be able to hear the same sound as you would when you take photos using the iPhone Camera application, so the device isn't in silent mode.
Step 10. An image thumbnail will be displayed in the bottom left area in the lower-left corner of your screen. Within a couple of seconds, the thumbnail will vanish, and the image will automatically be saved in your library of photos. It is also possible to remove it anytime to add it to your photo library right away, or click on the image to crop it, add annotations, and upload it together using the steps previously described.
Be aware that AssistiveTouch has a range different ways of doing the same thing. If, for instance, you'd rather set the screenshot shortcut as a long-press instead of a double-tap,. Additionally, you can single-tap the AssistiveTouch button to access the menu, which includes many other options. It is also possible to take an image from this menu by clicking the device's menu and selecting More Screenshot This could prove helpful if you're looking to use your double-tap as well as the long-press actions for various other functions.

Edit and add annotations to an image
After you've successfully taken the image, you'll be able to see tiny previews in the corner to the left of the screen. The preview will disappear within a couple of seconds; however, you are able to move it left to close it. This way, it is saved into your library. You can then continue doing what you had been doing prior.
You can, however, take a screenshot and perform a few quick edits or annotations prior to that happening. Here's how.
Step 1. When you have taken a picture, Click on the thumbnail, which appears on the left-hand side of the screen.
Step 2. Your image will appear with a simple editing window and is ready for cropping or adding to an annotation.
Step 3. If you'd like to save just a portion of your image You can adjust the handles for cropping to draw a line around the area you would like to save. It is also possible to utilize the traditional pinch-to-zoom gesture to expand a section of your image.
Step 4. It is also possible to add an annotation or markup to your image by drawing your finger. An array of annotators are located in the lower right corner of the screen for editing. There are also Undo and redo buttons on the top of the screen, so that you are able to reverse any changes you aren't happy with.
Phase 5: To add more advanced annotations, such as the text box, magnifier loupe, or even your signature, press the plus button on the lower-right corner. Select the desired option in the menu that pops up.
Step 6. After you're done making changes, click Done in the upper left corner.

7. Select Save to Photos and Save to Files for saving the image to your library of photos or to iCloud Drive, depending on the option. Also, you can select the delete button in case you've changed your opinion and no longer intend to save it.

If you snap many photos in succession, each one will show up on the editing screen simultaneously. The user can swipe left or right to navigate between them and then edit each separately. The ability to delete any individual photo from the editing screen is available by clicking the trashcan icon on the upper right of the display. Clicking “Done” will ask you to save or erase the entire collection.
Take a picture and share it with us.
Screenshots by default will automatically be saved to your library of photos, which you are able to share exactly the same way you share any other image. But if you're looking for specific screenshots to send out to someone else or share on social media sites, you can instantly share them. It also means you can avoid adding a photo to your photo library if you do not want to store it in the future. Here's how.
Step 1. Once you've taken a photo, tap the thumbnail at the bottom left corner of the screen.
Step 2. Your screen will display using the annotation mode that was described in the section before.
Step 3. If you'd like to crop or add annotations to the image before sharing, then go ahead.
Step 4. After you've finished, press the Share button located in the upper-right corner.
Phase 5: A Share Sheet for iOS will open with the ability to share the image through text messages or emails, post it to social media sites, transfer it to an additional Apple device using AirDrop, or store it in a different location similar to Apple Notes.
Step 6. If you wish to upload your screen shot to another website, click the Share button once more. It is possible to repeat the steps until you would like to share your screenshots in several locations.
Step 7. Once you've finished sharing, tap Done on the left-hand side of the screen.
Step 8. Select the Save feature for Photos and save to files in case you'd like to save a copy of your screen shot; otherwise, you can tap the delete button. This choice only affects whether or not your screenshot is saved to the photo library of your computer or iCloud Drive. It is still sent to or saved by all other places that you've shared the screenshot with.
Did you know you can use button combinations to reset the functionality of your iPhone? Read our tutorial for more information on how to do this. If you're brand new to iOS, you can find additional iOS strategies and tips that will help you become an expert on the features of your iPhone.